Hi All!
I wanted to pool together my recent Autumn crafting activities into a post- to hopefully inspire and get that craftiness within going! This is honestly such a fun time of year to dive into projects- whether they be for your home, a kid’s party, a food filled gathering- just try something!
I’ll start with my most recent craft-
The DUCK TAPE PUMPKIN.
I have been looking for ways to decorate our family of pumpkins without actually carving- our neighborhood squirrels are nuts. Haha. But really, they take our pumpkins prisoners and pretty much destroy them as soon as they are set out carved. I also found that all the fun & pretty decorations would just fall off in the rain. Boo! So- when I stumbled upon the idea of using the MANY different styles of DUCK TAPE- it was a no-brainer! Sign me up!
I just went to Joann’s and enjoyed their variety of tape. Even more online! Imagine the possibilities??!!

I picked purple with owls ( feeding my owl obsession) & went home to start!
I grabbed a pumpkin- the size they give you at the patch when you go to the festivals.( I thought this was a good size to experiment on…)

And then just started at the top, under the stem, and ran the first piece down to the bottom of the pumpkin-I put the kiddies in charge of smoothing out the bumps as we went along.
They loved helping and watching the pumpkin transform from orange to patterned!!
REPEAT until the whole pumpkin is covered!
So very kid friendly and it will last!!
Enjoy making!
NEXT Autumn craft :
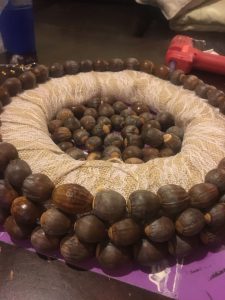
The Acorn Wreath
Again, super kid friendly- my daughters ( 2,4,6) collected all the nuts!
I began with a flat topped Styrofoam wreath form, available at your local craft store, and wrapped it in lacy burlap ( left over from my lampshade redo.) I find that things stick to an actual material better than they do the Styrofoam.
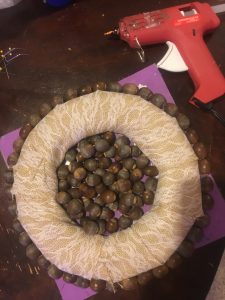
Then, start on the outside edge, and begin gluing! I decided to face them all the same direction for a more uniform look, But I did not discriminate with the color, texture, size of the acorns. I think they are all beautiful and it was a natural creation to mix them all.
Make sure something good is on the TV, or you are listening to a book on tape because, this does take a while. But it is the mindless busy. You can do it!
Keep on gluing, and work your way into the very center of the wreath form. I was 4 acorns short, and had to wait until morning to go get more! Ah! But it was worth the wait.


Topped of with orange sparkly ribbon- and hang it somewhere!
Mine was originally inside, but our house temperature helped to pop out some sprouts! OOOO! So I relocated outside. NOT THINKING ABOUT THE SQUIRRELS.
Alas, this happened.

Boo!
I will replace them and try to find a location unknown to these little pests!
Wish me luck!
Happy making!
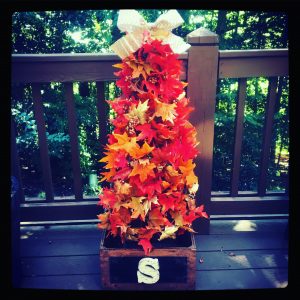
The last of my recent Autumn crafts was from a DIY challenge by my sister.
She tagged me on Facebook to a video: creating little Fall topiaries from tomato cages and garlands.
Challenge accepted!
Here is the video link-
http://www.hometalk.com/22543397/fall-topiary-with-lights?date=20161011
I didn’t fall in love with her bases, so when I went to Home Depot, I was on a hunt for something different.
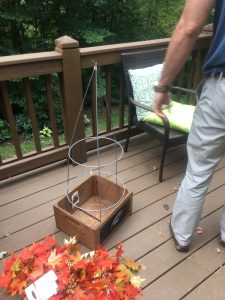
I was pleasantly surprised to find this cute wooden box with a chalkboard paint front. Loved it!
I decided to only do 1, since my townhouse, inside and out, are spatially limited.
Went to the craft store, took advantage of the already reduced Fall prices on the garlands( bought 4- as recommended in the video), used my 20% off entire purchase coupon, and went to home to begin!
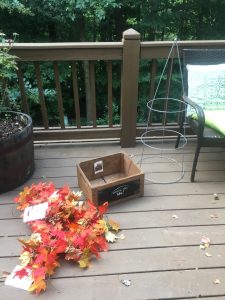
My hubby used a sharp saw to cut off the bottom circle base of the cage, and I used the 3 newly exposed poles to secure the cage into the wooden box. (I attached the 3 top poles with a rubberband.)
It was taller than I thought!
As soon as I began stringing the garlands, I quickly realized I would need more. So I stopped at 4, and went back to the store the next day.


Now, 7 total garlands total, covered the cage nicely.
I did not use wire or glue or anything to secure the garlands, I’m hoping to reuse this for a Christmas topiary.
I simply used the plastic-y ends and wrapped them around the next plastic-y end: almost tying them in a knot.
I was always tinkering with the up and down of the leaves, making my best attempt to cover open spots and the cage wire.
I made a bow out of leftover chevron burlap ribbon, and finished with a little wooden S for the box.
I”m thrilled. I am thinking of adding lights soon!
Enjoy!
Join me next time for some new and exciting DIY crafts!!